
Setting up knob macros
This walkthrough configures a Control Change macro on knob 1, macro row 0. The same navigation applies to every macro mode — only the parameter grid changes after you pick a mode.
1. Select a knob on Perform
Turn a panel knob so Perform shows the knob you want to configure. To pick by name without moving the physical control, Back opens the Knobs Grid; encoder highlights a name; Select confirms it.
The encoder on Perform does not walk knobs or open the grid.
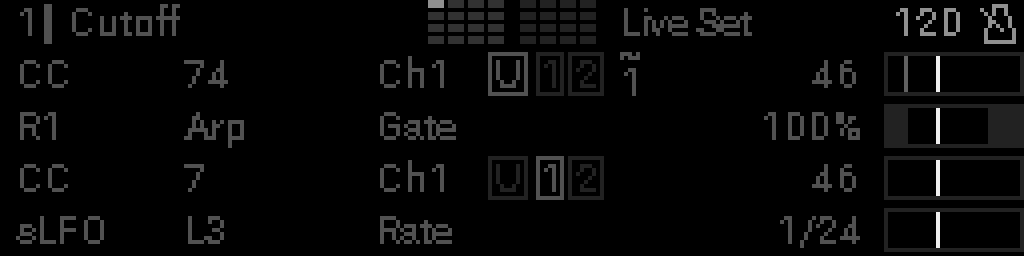
2. Enter edit mode
Long-press Select to open edit mode. Macro rows 0–3 appear on the left with four-corner marks around the whole row.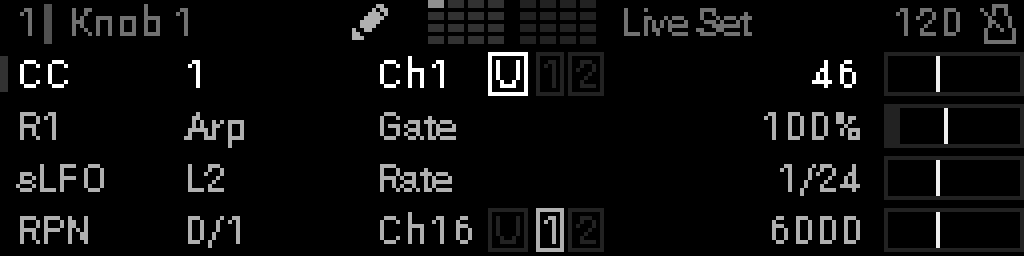
3. Choose a macro row
Turn the encoder Turn the encoder to move the selector. Edit mode opens on macro row 0. One step up is BPM; two is the knob name. Macros follow BPM in order 0–3.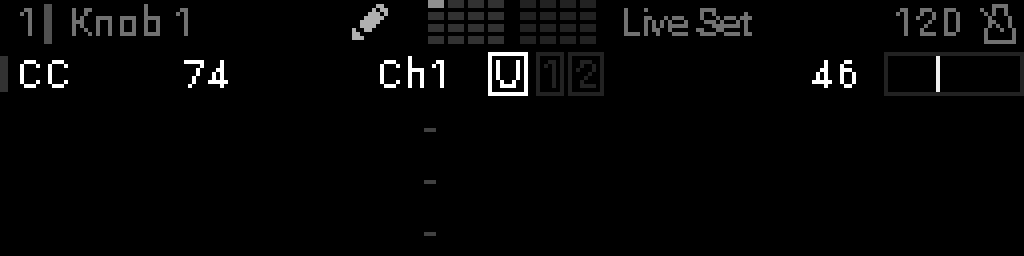
4. Open the macro grid
Press Select again to open that macro’s parameter grid.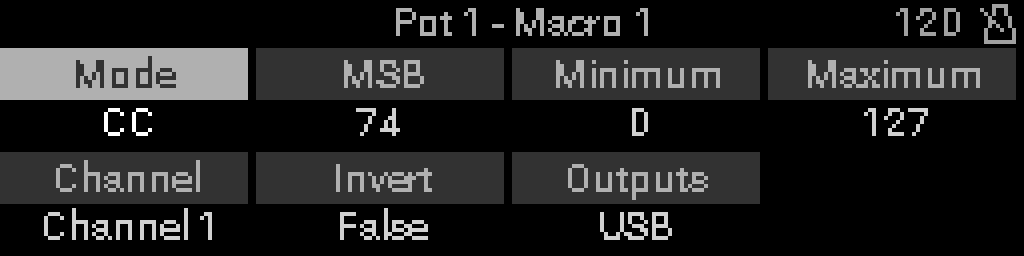
5. Set the mode and parameters
| Step | Action |
|---|---|
| Mode | Turn the encoder Turn encoder to pick CC, Device parameter, S32 LFO, SysEx, etc. Each mode has its own reference page. |
| Minimum / Maximum | Endpoints mapped to knob travel. |
| MSB / LSB / Channel | MIDI addressing (mode-specific). |
| Outputs | USB and DIN port mask for MIDI modes. |
| Invert | Reverse knob direction when needed. |
| Pickup | Soft takeover on/off — see Pickup mode below. Default False. |
Example: CC mode with MSB 74 (filter cutoff), channel 1, outputs USB + Out 1.
Dialing wide value ranges
Value editing follows how fast you turn. A slow, deliberate turn always moves one unit, so you can land on an exact number. Turning faster takes bigger steps, scaled to the parameter's range — a high-resolution Minimum / Maximum (0–16383 on CC14, NRPN, RPN, pitch bend, SysEx) crosses in about a hundred clicks instead of thousands, while 7-bit and short list values stay fine-grained. Sweep quickly to get close, then slow down to fine-tune.
Pickup mode
Pickup mode stops a sudden value jump when your physical knob does not match what the project expects — for example after loading a project or recalling a snapshot.
Turn it on
- Open the macro grid for that row (steps 1–4 above).
- Turn the encoder Scroll to the last row — Pickup.
- Set it to True.
Pickup is off by default. It is only shown for modes where soft takeover makes sense (CC, program change, channel aftertouch, poly aftertouch, 14-bit CC, device parameter, CV16, and LFO parameter macros). It is hidden for NRPN, RPN, and SysEx.
What happens when you play
After a load or recall, if the knob position and the stored value do not match:
- Pickup arms automatically.
- On Perform, the macro value dims. The indicator bar keeps the solid value line on the physical knob (dimmer) and shows a dotted line at the target (last actual value, or the morph blend as it moves).
- Turning the knob does nothing until you reach that line.
- When the knob catches up, pickup engages and MIDI (or internal routing) works normally again.
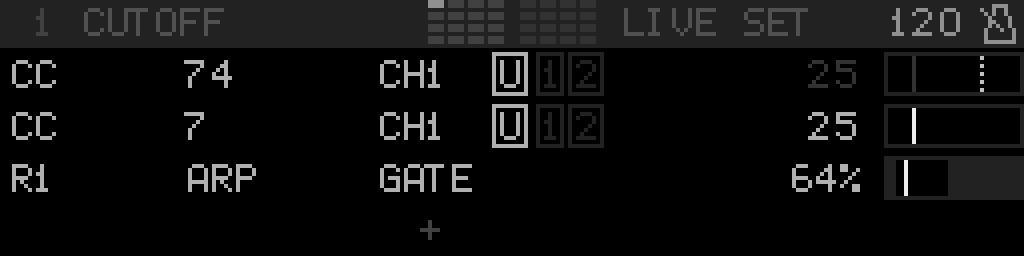
Row 0 in the screenshot: dim value, solid value mark still on the bar, dotted pickup line at the catch point. Row 1 is a normal macro for comparison.
If the knob is already at the stored value when the project loads, pickup does not arm — you can play right away.
What counts as the target
| Macro type | The dotted line marks… |
|---|---|
| CC, PC, channel aftertouch, poly aftertouch, 14-bit CC | The value last received on that MIDI address (from your DAW, synth, or another controller) |
| Device parameter | The parameter value stored in the project or snapshot |
| CV16 / S32 LFO | The value stored for that macro when the project or snapshot was saved |
For MIDI address macros, if something else moves the parameter (automation, another controller), pickup re-arms against the new value so you always catch up softly.
When to use it
Turn pickup on for macros where a jump would be audible — filter cutoff, volume, send levels, device parameters, CV outputs.
Leave it off if you want the knob to snap to the saved value as soon as you touch it.
More detail on the on-screen indicators: Perform View — Pickup mode.
6. Exit and play
Press Back to leave the macro grid, then Back again to exit edit mode. Turn the knob — the macro sends MIDI (or routes internally) according to your settings.TIP
Macro edits in the grid are committed when you leave the grid with Back. Leaving edit mode without backing out of the grid first keeps those changes.
Macro Options
In edit mode, long-press Select on a macro row opens Macro N - Options. Modulation nests Assign / Edit / Enable-Disable / Remove LFO. MIDI Learn, Name, Edit the Device, and Edit Message stay on that list. IN SNAPSHOT ON/OFF is this macro’s live switch. It starts ON. OFF leaves the macro where it is on every recall, fade, and morph, even when no knobs snapshot is occupied. A Disabled row is MIDI Learn and IN SNAPSHOT. See Edit mode.
Mode-specific setup
| Goal | Mode | Reference |
|---|---|---|
| Send MIDI CC / NRPN / SysEx | Standard MIDI modes | Macro reference |
| Control a rack device parameter | Device parameter | Device parameter |
| Modulate an S32 LFO from a knob | S32 LFO | S32 LFO parameter |
| Drive CV16 outputs | CV16 modes | CV16 direct / CV16 LFO |
| Edit SysEx payload bytes | SysEx → Message row | SysEx editor |